Thursday, June 11, 2009

Baby Scrapbook Theme Albums From A to Z

Alphabet Scrapbook Pages
Remembering the alphabet and using your baby's photos can be fun and educational for the entire family. Try making an alphabet or ABC baby scrapbook. Attach a colorful letter to each page in baby's scrapbook album, die cut words and photos to remember all of your baby's special moments. 

Here are a few suggestions to get you started: 

A
Animals (photo from trip to zoo), aunts, apple 
B
baby, bottle, bubbles, brothers, birthday, blanket, bibs, booties, books, blue
C
cake, candles, cousins, crawling, cradle, cereal, Christmas, cookie, car seat
D
doll, dog, daddy, diapers, December, duckie, Dora the Explorer
E
eating, ears, Easter, elbow, Elmo
F
First..., fingers, first foods, formula, feeding time, February, fourth of July, father, friend, funny, funny faces
G
Grandma, grandpa, gifts, guests, girls, gurgling, going (to…)
H
Hair cut, hands, home, hospital, happy birthday, Halloween (1st)
I
Icing, ice cream, immunizations, in (the bathtub)
J
Juice, jello, January, jumping, June, July, jar food, jammies
K
Kids, kisses, Kodak moments, kitchen 
L
Leaving (waving bye-bye), love, little (fingers and toes), lullabies
M
Mommy, me, my gifts, my ..., "ma-ma", mine!, march, may, music, milk
N
Nose, nursery (rhymes), nursing, nana, November, numbers, naps, newborn
O
One, onesies, osh kosh, October, "oh-oh", orange
P
Presents, parents, party, peek-a-boo, photos, pictures, pink, patty cake, pj's, pots and pans
Q
Quiet, quilts, quality (time)
R
Rattle, rolling over, rocking horse, reading, rocking chair, red
S
Sisters, stories, song, sitting up, solid foods, sippy cup, swing, silly, smiles, September, St. Patrick’s Day, standing, snow, spring, summer, Sponge Bob
T
Top, teeth, toys, Teletubbies, tears, toes, t-shirt, teddy bear, tummy, thanksgiving, tickles, twins, triplets
U
Uncles, unhappy, underwear, under
V
Video, visits, Valentine’s Day, veggies, violet
W
Wash, weight, wagon, walk, wave, winter, white, water
X
Xylophone, x-ray 
Y
Yummy food, yams, yogurt, yawn, yeah, yard, year, young, yellow
Z
Zoo, zzz, zippers

I Can Count 1, 2, 3
Cherish all the first, second and third moments of your baby's life with baby scrapbook pages. From the first smile to the first haircut, you will want to treasure these photos with their own baby page. Make a counting baby scrapbook by including pictures of similar photos. Try using one baby, two babies, three girls or boys, four smiles and so forth. Embellish pages with baby stickers, die cutouts and bright, colorful numbers. Add pages and pictures throughout baby's first year. Baby scrapbook theme albums can be used not only to preserve special moments, but also to learn numbers and counting.

Animals, Animals Everywhere
Does your family have a pet? How many stuffed animals are in your baby's room or toy room? How many times has your family visited the zoo? Savor all these animal memories by creating an animal and baby scrapbook album. Use traditional film or a digital camera, take photos of your baby with his favorite teddy bear, playing with your cat, dog or other pet, sleeping in his crib with stuffed animals and photos from your trips to the zoo. Decorate with animal stickers, appliqués and animal theme pages to create a special animal and baby scrapbook theme.

Three Make a Volcano Projects: Easy, Intermediate, and Spectacular!

Project 1: The Easy Volcano

This is a minimum mess project. Instead of the traditional paper mache or clay technique for building the cone of the volcano you can use poster board. The poster board will work fine for multiple uses but it is best if you seal it with paints or even some kind of a spray sealer. The technique for making the cone of the volcano is simple. You cut a slit from the middle of one side (a long side) all the way to the center. Then you just overlap both sides of the cut so the poster board forms a cone much like a big party hat. When you have it in a pleasing cone shape simply tape the ends together so it stays in shape. Cut a hole in the top for your bottle and then trim the whole thing down to an appropriate size. Put your bottle inside it, stuff the cone with newspaper for strength then tape it down to a board. Remember to paint it or spray seal it for durability against the erupting liquids of the volcano. Once it dries it is ready for eruption. 

Project 2: The Intermediate Volcano

You select your bottle which can be just about any size ranging from a 2 liter to a 20 ounce. Place it in the middle of a sturdy board then cover it with clay or paper mache so it forms the cone shape of the volcano. If using paper mache or plaster build a frame of cardboard strips in the cone shape first then apply the paper mache to the frame. Once it is done you can paint it and it is ready to go.
To make either if these volcanoes erupt:
•fill it almost full with water
•put 4 or 5 drops of detergent right into the water
•Add Two Tablespoons of Baking Soda to the water
•Put the Volcano over the bottle so it is in place and ready to go
•Pour some vinegar right into the volcano bottle and watch it Erupt!!

To Make Paper Mache: 
Paper mache is easy to make. It is just two parts water with one part flour. Mix it to get a nice gluey consistency. You then soak strips of paper towels in it and apply them to the shell to get a nice volcano look. 

Project 3: The Spectacular Volcano

This volcano uses the power of Mentos and Diet Coke and it will erupt a spectacular stream a couple of feet into the air. You can make this volcano with either of the earlier techniques but you really need to water seal the cone. If you don’t, the explosion of soda will ruin the volcano and it won’t be usable more than once or twice. If you want to really make a fast but durable and waterproof volcano you can use a spray can insulating material called Great Stuff. You place your two liter bottle of soda on a board and then spray the Great Stuff all around it so it forms the cone of the volcano. Once it is dried you can paint it and you are ready to go. Great stuff will spray into a great looking magma shape and it will take you about two minutes to make your volcano from start to finish. 

A note about use of Great Stuff: It is a common insulating foam used in the building industry and it is not for children to use alone. It must be applied by an adult and safety glasses and safety gloves must be worn. Follow all safety instructions that are written on the can including application in a well ventilated area or outdoors. 

To erupt the Mentos and soda volcano: You simply drop three mint Mentos into the bottle at the same time and step quickly back! Three Mentos is the optimal number for the best volcano and you can’t use the flavored type. It has to be the normal mint. The key is to get the Mentos to all drop in at the same time so you should practice by holding a stack of three and then dropping them. Do this a few times into an empty bottle so you get the feel of it. You can roll a tube out of a piece of paper and stack the Mentos in that. Put a piece of cardboard over the bottle, place your tube of Mentos over the cardboard then when you pull the cardboard away the Mentos will fall into the bottle. 

A note about the Soda: You don’t have to use Diet Coke. You can use just about any two liter bottle of carbonated soda. But I recommend you use a diet variation because there is less sugar and the resulting mess will be less sticky and easier to clean. 

Making a volcano is a fun activity because you can learn about volcanoes and you can get to play with the volcano you made.

Terrariums for Kids: Creative Ideas for fun and learning


Terrariums are a great project for kids because they encompass a lot of different things yet are not too hard of a project to make. This article gives you great ideas for terrarium making for kids of all ages and includes learning materials, container selection, plant selection, care, and more. 

There are two basic types of terrariums and you can tailor the type you make to the age and skill level of the child. The first type of terrarium is an open dish type. This is simply an arrangement of plants in an open container. It can be a dish, bowl or just about any type of container that will hold at least a quart of soil. This type is the easiest to make and the easiest to care for. 
The second type of terrarium is the closed style. It is completely enclosed in a jar, glass, or container. This type is much more attractive and fascinating but it is also more challenging to make and to maintain. This type of terrarium is also very well suited for explaining how an eco system works because it is a closed eco system. 

The Perfect Compromise for a Container

A perfect compromise of closed and open terrarium is one that is made inside a large cookie jar. This is the type of glass cookie jar that has a large metal cover with a knob on it. The cover is usually offset at an angle to the side. They usually hold about a gallon to a gallon and a half of liquid. 
This container is perfect because the very large mouth makes it easy to put plants and other materials into it. And the easily removable metal lid makes it easy for a child to reach in and prune or water the plants. And if the terrarium has been over watered the child can just leave the cover off for a couple of days. This will evaporate a lot of the excess water. 

If you do not have one of these glass cookie jars here are some guidelines for choosing an alternate container. Choose a large container that is glass or plastic (preferably clear plastic if the project is for younger children) and insure it has a very large mouth opening so little hands can reach easily into it. Then finally, choose something with an easily removable lid. This will allow you to cover it for a closed system but also to remove it if it is over watered. 

Plant Selection

You have a lot of options when it comes to selecting plants. If you want plants that will be very hardy and very durable you should consider using succulents or cacti. They generally have a very high tolerance for sunlight and do not need a lot of watering. (You can let the soil dry out before watering it again). They also generally require very little pruning or maintenance. So they are a good choice for younger children – just avoid any cactus with dangerous or harmful spikes and thorns. 

For older children you can use almost any small type of plant that can be bought in a home improvement store or nursery. Select plants that are labeled as hardy, and grow to less than six inches in height. Keep all the information tags that come with them so you always have a reference for sunlight and watering. 

The third alternative to plants (and the one I like the best) is to go for a hike and dig some up. This adds a wonderful dimension of discovery to the terrarium. Select small plants in a wide variety of shapes and sizes and choose them all from the same area. If they are all growing in a relatively small area you increase the chances that they will thrive in the little eco system you create in a jar or bottle. 

Final Thoughts about Plant selection

I recommend you purchase or find an odd number of plants. An odd number of plants generally makes for a more pleasing arrangement than an even number. It has a more artistic look to it. I also recommend you choose plants in a variety of shapes, sizes and colors; if the plants are different heights and colors the terrarium will be much more interesting to look at. Finally, if you are purchasing plants, be sure they all have the same basic requirements as far as watering and sunlight is concerned. Being all in the same container they will all have the same amount of light and water so if they all have the same requirements you can treat the arrangement as one entity and not have to try to treat each plant differently.

Making the Terrarium

Here is the process for making the actual terrarium. You can vary from this process and I will point this out. 

-Put a layer of pebbles in the bottom of the container. Make it about one inch thick. This will allow for good drainage.
-Put a layer of activated charcoal right on top of the pebbles approximately one half inch thick. This will filter the water. (This step is totally optional)
-Put a layer of Sphagnum moss on top of the charcoal. Sphagnum moss is a dried and wiry material and what this does is act like a barrier so the soil does not slip down into the rocks at the bottom. (This is optional but recommended if you want a cleaner and sharper looking terrarium)
-Put a layer of soil on the top of all of this. The layer should be at least two or three inches thick but you can vary this according to the size of your container. 
-Poke small holes into the soil and transplant your plants into the container. 
Place some miniature colored stones or figurines in the container for an interesting look. 
-Water it a moderate amount and cover it. Now just monitor it over the next few days. If it needs more water then add. If it is too wet then keep the cover off so it can evaporate. 

A Thought about the Plant arrangement

Before you actually transplant the plants into your terrarium you should arrange them on a table. Move all the pots near each other then move them around to find an arrangement that is pleasing to the eye. Once you find an arrangement you like you then just transfer that to the container. 

Learning Lesson for kids: Terrariums as an ecosystem

A terrarium is a miniature ecosystem which is a complex system of relationships between organisms and resources of different types. The predominant organisms in your terrarium ecosystem are plants and the micro-organisms in the soil. The major resources are water, sunlight, and soil. These all work together to form a miniature little system that can sustain itself for long periods of time. If you have a good balance of plants, soil, nutrients, and water in your terrarium you will be able to seal it up and watch it grow and thrive for very long periods of time – sometimes even years. 

The ecosystem inside your container is very similar to that in the real world. There is water accumulated in the soil and in the pebbles and sunlight will cause this water to evaporate and form droplets along the sides and top of the container. These drops will grow larger and then fall back into the soil. This is a circular process that will continue as long as there is water and sunlight and this rhythm will bring a constant supply of moisture and nutrients to your plants. And if you have put activated charcoal in your terrarium it acts as a filter. As the water passes through the charcoal all the impurities are trapped so the water is more pure for the next cycle. In the real world the same thing happens when it rains. Water is evaporated up to the clouds then released back down in the form of rain. It is a continuous cycle just like inside your container. 

Caring for your terrarium

A terrarium needs to be watched carefully for the first week. This is to insure it is getting the right amount of light and water. If you purchased your plants you should look at the tags that came with them and follow the watering and lighting instructions. If you found your plants outdoors you should try to simulate the environment they were found in. Were they in an open field with lots of sunlight? If so then give them lots of sunlight. Were they in a forested area with only moderate light? Then keep them in a window that only gets moderate amounts of light. Finally, if you found the plants yourself, were they in rich and moist soil or dry soil? Simulate this when watering. 

Watering

For the first week you should watch your plants very carefully. Are water droplets forming on the glass? If so, this is great! But if the soil seems soggy then you might have over watered so you should take the cover off for a couple of days and let it dry out a bit. If the soil is dry and very few droplets are forming you should add a little bit of water. But if you are using cactus and other desert plants it will be ok to let the soil get a bit dry. After about a week with the plants looking pretty good you can be confident that the cover can stay on it for long periods of time. And if sunlight only comes into the terrarium from one particular side (like in a window) you should rotate the terrarium every couple of days to ensure the plants don’t all grow at an angle pointing toward the window. Rotating the terrarium will force the plants to grow straight up.

Pruning and Trimming

Over the course of time the plants in the container will grow and you can reach in there and trim them gently with a small pair of safety scissors. This will keep it attractive looking and will keep the balance of the ecosystem. 
A terrarium is a wonderful project for kids to make and it is a living system that will bring a child much enjoyment both in the making of one and the long term caring for one. It is a great opportunity for children to learn about plants and eco systems and it’s a great project because it doesn’t take too much effort or care to maintain. It is a closed system that will thrive with very little care.

Address Stamp Collecting - A Sticky Hobby?

Do you ever notice the picture on the address stamp? It is astounding to see just how many different kinds of address stamp pictures are seen on envelopes throughout the world. From famous presidents to regular members of the Disney World crew, there are many different pictures and icons that are featured on an address stamp.

If we now reflect on some of the images we see on these stamps, we'll see that these small little sticky pieces of paper mean more than the cents we pay for them. Therefore it can be concluded that there is a certain amount of memory value or meaning behind an address stamp for some consumers.

Many people collect stamps because of this - the meaning behind some of them. The age-old hobby of collecting stamps can be a passion, or something that started when someone found one that had some kind of momentous value to it. After all, this type of value will certainly give enough rationale for anyone to hold on to it.

Collecting stamps can serve as a means to relax, to reflect, to play or more simply a time of redemption. It is amazing to think about the ways a simple address stamp can exert a positive impact on someones life, and not just because he or she gets an all important letter in the mail either. The bottom line is that collecting address stamps may not be for everyone, but it sure should not be ruled out as a great hobby to take part in when it comes to embracing part of our American culture, or our Worlds culture for that matter.

Equivalent to paintings or portraits, address stamps attempt to preserve past lives or highlight current trends within a tiny piece of art, and what better way to keep and share the art than by collecting as many pieces as you can and putting them in a book of some kind. Many people who really could not care less about what is printed on an address stamp might think collecting them is simply a waste of their precious time, and for some people it just might be.

It can serve as a relaxation time, a time to reflect, and plain and simply a time of redemption. It is amazing to think about the ways a simple address stamp can impact someone in their lives, and not just because they get an all important letter in the mail either. The bottom line is that collecting address stamps may not be for everyone, but it sure should not be ruled out as a great hobby to take part in when it comes to embracing part of our American culture, or our Worlds culture for that matter.

Freeze-Drying Flowers


Flowers symbolize the most important events in our lives. We receive a dozen red roses that say “I Love You”, a stunning bouquet on our wedding, gifts for our anniversaries birthdays, graduations---the list is endless. Of course, we want to preserve happy memories forever, if possible. We can take pictures of the flowers but that isn't as good as the real thing, is it? Some of us resort to the old practice of putting flowers between the pages of thick and heavy books to preserve them. The flowers come out dry and flat. While this is better than nothing, we can't help but wish that flowers don't wilt and decay so that we can keep them forever as mementos of that special time in our lives. 

Well, wish no more! We live in the 21st century when technology solves almost anything. Now, there's no need to settle for dry, brittle flowers kept between the pages of a book or dried in the sun. A technology called freeze-drying can preserve your flowers exactly the way they look like for very long periods of time. Freeze-drying is said to have first originated from the Indians living in the Andes Mountain is the 1700's. Its modern version, however, was introduced in 1813 by William Hyde Wallaston to the Royal Society in London. Back then, it was a procedure simply known as sublimation, or the conversion of liquid in a frozen state directly to a gaseous one.

The freeze-drying process makes use of a freeze-drying machine for flowers. Using sublimation, the moisture in the flowers is completely removed. The pressure in the chamber is reduced by creating a vacuum wherein the boiling point of water is below its freezing point. Electromagnetic radiation is applied on the flowers so that the water in its tissues will not evaporate. This way, the tissues won't shrink, preserving the exact appearance of the flowers. After the process, a polymer coating is applied on the flowers in order to prevent shattering and to stop moisture from being absorbed in the tissues again. If the colors of the blooms fade, they can be painted back on.

Freeze-drying is the most expensive way to preserve flowers. In tropical countries such as the Philippines, freeze-dried flowers require high maintenance because of the tropical climate when the moisture content can reach up to 99%. However, freeze-drying is the only way to keep your flowers exactly how they look like for a long time. The technology might be expensive, but the results are rewarding. Imagine seeing your wedding bouquet everyday and remembering that heart-stopping moment when you said “I Do”. It would definitely be worth the price.

Stone Craft In India - A Preview


Different kinds of rock originated on earth after numerous geological activities. These rocks with their different compositions came to be called stones like Redstone, Soapstone, Sandstone, Limestone, Marble, Granite and many others. Indian landmass is also made up of several kinds of rocks and the stone obtained here has been used in making forts, palaces, temples, sculptures, household items and for other miscellaneous purposes. In India, stone crafting traditions have their roots in pre-historic times, as at that time the weapons and other tools were made of stone. More professional approach in stone craft came in 7th century BC. During this time, several guilds of stone carvers and masons existed in India. During Maurya rule stone craft reached to its perfection. A number of rock stupas, rock cut caves and Buddhist chaityas were raised during this period. In India, all kind of stone sculptures and structures used to be made according to Shilpshastra, an ancient Hindu treatise on sculpture and architecture.

Region Wise Study of Stone Craft in India

In India, there are some regions that are specifically rich in stone culture. A classical culture prevails there of stone crafts. Depending upon the type of stone found and the tools used, the style and the finishing has been different and unique.

Stone Carving Practices of Orissa:

Stone carving is one of the major handicrafts of Orissa. Several archaeological monuments, rock-cut sculpture, carves and magnificent temples testify the claim. All these have undergone intricate and very fine stone carving by the deft hands of the artisans. The temples of Puri, Konark, Lingaraj, Parasurameshwar and Mukteshwar are just the wonders crafted in stone. Whereas the stupas erected at Lalitagiri, Ratnagiri and Udaygiri are just par-excellence. The art of stone crafting reached pinnacle in the ancient and the early medieval period in Orissa with detailed exploration of each and every nuance of the stone craft. This art has automatically passed on to the present generation from their earlier generations. The present breed is not far behind its predecessors in creating the exact replica of the old masterpieces. Similarly, small sculptures are also made in big quantity catering to the huge demands of the visitors and the locals.

Stone Carving Practices of Rajasthan

Rajasthan has, though scarcity in wood and forest but it has abundant stone mineral.The landmass of Rajasthan is rich in different rocks like Granite, marble, Quartzite, Slate and other metamorphic rocks. The forts and palaces of Bharatpur, Baroli, Ramgarh, Nagda, Ajmer, Chittor, Mandsore, Jaisalmer, Bikaner and Udaipur have been made using these stones. The jaaliwork or the latticework of Ajmer, Udaipur, Jodhpur, and Bikaner is of fine quality and intricate finish. Rajasthan has most significant quarries of marble at Makrana. The marble mined here is used profoundly in the world famous stone sculpture of Taj Mahal as well as the stone wonder, Dilwara Jain Temple at Mt. Abu. The artistry in Dilwara Jain temple is exquisite, fine, intricate and just fascinating. Different places of Rajasthan are famous for different kind of stones found. Kota is the center of production of grey stone which is used in floor making. Similarly Barmer and Ajmer are famous for Yellowstone and granite respectively. Beautiful statues of deities are made using the soft stone mined from the quarries of Dungarpur. Jaipur is the place where sculptures of all kinds are made by white marble. The statues of deities carved in Rajasthan are sent to all areas of the country.

Stone Art Practices of Uttar Pradesh

Mathura, Varanasi and Agra are the famous centers for stone craft in Uttar Pradesh. Some pieces of stone sculptures have been found from the excavations at Mathura and other adjacent areas belonging to Maurya period. The interesting fact is that lavishly used stone in these sculptures is the red sandstone mined from the Chunar. It indicates that this land once used to be the center of stone carving art some thousands of years back. During medieval period under the Mughal rule, several beautiful palaces and forts were constructed chiefly with the help of stone. Some fascinating examples of the stone sculptures if Uttar Pradesh are: Red fort of Agra, The Taj Mahal, the palace of Fatehpur Sikri, The tomb of Akbar at Sikandara and many more.

In the present times the focus of the stone craftsmen is changing towards exploring new kinds of stones as well as new article to be made. Nowadays they make the stone sculptures that beautify the home or the gift articles like candle stands, ashtrays, jewelry boxes, and Taj replicas. Carved pillars, railings and fireplaces are the architectural objects that the craft persons are making. Rupbas near Agra and Karauli are the quarries which have produced the red stone used in the forts and palaces Agra, Delhi and Fatehpur Sikri.

At Varanasi the stone used is not hard marble but soft stone called Gorara. This is the stone that is brought from the Hamirpur and Mahoba areas. This stone has a unique quality to change its colors on polishing. Bowls and the servicing dishes are the popular products made of gorara stones. Sonia and Kalimohal areas of Varanasi and Gokulpura area of Agra are the centers of the main activities of stone craft in U.P.

Stone Art Practices of Southern India

In southern India, the temple architecture of Hoyasalas at Halebid and Belur are most exquisite and splendid example of stone craft. 57 Feet tall stone statue of Jain saint Gomateshwara at Shrabanbelgola is another example of marvelous stone art. Similarly, the ruins of Vijayanagara Empire at Hampi in Bellary are also the samples of glorious Indian tradition of Stone craft.

Other classic stone examples of stone craft in the southern part of India are: Meenakshi Temple Madurai and its 1000 pillared mandaps, Chidambaram Temple with beautiful panels depicting 108 karanas of the Natya Shastra, Kanchipuram accommodating a number of temples from he era of Pallawas to Nayaks and Granite carvings at Mamallapuram and Chingalpet. The Kailash temple at the Ellora caves is the monolithic structure whose craft is just unique and astonishingly beautiful.

Handmade Paper - Do It Yourself

Recycling is the norm of the day. So, if you too want to contribute to the cause of environment and if you are interested in doing some craft yourself then here is the simple method of making handmade paper. Do it yourself and see how good it feels to use a paper made with your own hands!
Selection of Raw Material Papers
The basic material required for the project is paper that can be any thing- unprinted computer paper, magazines, egg cartons, toilet paper, paper bags, office paper, typing paper, napkins, construction paper etc. Just remember that old cards will make heavier paper while tissue paper will make finer paper. If using non waxed boxes then pre-soak them in warm water. Avoid newspapers as the chemicals and ink in them lead to a handmade paper which is a muddy -looking sheet of poor quality. If possible, combine a recycled base with equal amounts of abaca or cotton pulp. Buy it in semi-processed form so that it can be used in a household blender.
Tools Required for Making Handmade Paper
A blender

A laundry tub

Handmade paper mold and deckle

Torn pieces of recycled paper or cotton pulp

Fabric square (felt or flannel square)

Sponge

Newspaper or absorbent towels for a couching pad


Steps for Making Paper
Tear the selected paper into small bits and put them into blender with warm water. Make it about half full. Run the blender, increasing its speed slowly, for about 30 -40 seconds until the pulp becomes smooth.

Make a mold by stretching fiberglass screen (plain old door and window screen) over a wooden frame and stapling it. Make it as tight as possible.

Fill the tub about half way with water. Add loads of pulp and stir the mixture. The more pulp you add the thicker the paper will be.

Place the mold into the pulp and level it out keeping it submerged. Gently shake it side-to-side until the pulp on top of the screen appears to be even.

Now lift the mold up slowly until it is above the level of water. Wait until most of the water has drained. Add or remove pulp to obtain the desired thickness of the paper. If so, you'll have to stir the mixture again.

After draining the water, slowly place one edge on the side of a fabric square and gently ease the mold down flat, with the paper directly on the fabric. With the sponge, press out as much water as possible.

Hold the fabric square flat and gently lift the edge of the mold in a manner that the wet sheet of paper stays back on the fabric.

Make more wet papers by repeating the steps above. Stack the fabric squares on a cookie sheet and place one fabric square on the top of the stack in order to cover the last piece of paper. With another cookie sheet, press out any remaining water.

Now gently separate the sheets and dry them either by hanging on a clothesline or laying out on sheets of newspapers.


And here's your own handmade paper ready!

A Scrapbook for Every Occasion

As you step into your best friend’s house, your eyes are drawn instantly to the coffee table. A beautiful miniature book with the word EUROPE in big bold letters on the front is aching to be picked up. You’ve been hearing about the trip for weeks now, but have yet to see a picture. What a great way to explore the European countryside by seeing all the sights laid out in a book.

Scrapbooking a monumental task for many. The effort it takes to make one page alone is downright overwhelming. With the right ideas though and just a few supplies, you can easily make a scrapbook for every special occasion you want to remember. 

When you are just beginning, remember that scrapbooking doesn’t have to be frilly or cluttered. If you want more of a clean look, stick to basic colors and just one or two photos per page. Make sure to have a coordinating caption that tells what was going on and when. When you’re glancing through it 30 years later, you’ll be grateful for those captions!

Undoubtedly, you will probably run out of page ideas once in awhile. This is easily remedied by going to scrapbook or crafting website and seeing the ample suggestions they have readily available. Not only can you find the perfect page idea, but it will also list the materials you will need. 

Pictures from weddings, a special birthday, a new baby, or even a fun trip tragically end up in a dusty filing cabinet or on a hard drive. Being able to arrange those cherished photos in their own personal album will give you easy access for sharing and reminiscing. Scrapbooks can serve as your own little storybook of the precious times you never want to forget.

Make a Candle!


Candles are so nice! And they light up whole of your environment so beautifully! Why not try making candles yourself? You'll just need a handful of supplies and it's not at all messy!Supplies Needed for Candle Making
1. Wax- you can even use the plain white candles or crayons. However, if going proper way, then get some paraffin wax, soy wax or beeswax.

2. Wax melter

3. Thermometer- Specific candle making thermometers are there and they are just essential for candle making.

4. Mold- If not, then use any container, may be a glass, bowl or a tin.

5. Fragrant Oil- if, of course, you want some aromatic candles. Its optional.

6. Dyes- optional, only if you want colorful candles.

7. Putty- for molds
Steps for Making Candle
Select the type of wax to be used. If beeswax, you don't need to melt it. It is just wrapped around a wick and sealed using the thumb. If using paraffin or soy wax, they have to be melted and double-boiled.Place the wax melter in a pot half filled with water which should be kept on a burner with low-medium heat. Now place the wax pieces into the melter. When the wax melt, add dyes or fragrance. You can even place glitters to make a decorative candle. However, very little quantity of oil should be mixed( 1 tablespoon or ¼ of an ounce or 3% of the candle's weight of oil for each pound of wax melted) otherwise, the candle will not burn properly.Measure the temperature of the wax with the help of the thermometer. If you have selected a mold of cardboard, plastic or glass, keep the temperature at 130 degrees Fahrenheit and if the mold is made of some metal, then heat the wax up to 190 degrees Fahrenheit.While the wax is in the process of melting, prepare the mold. You can do it even before you begin to melt the wax- just prepare the mold beforehand- before the wax reaches the right temperature. For preparing it, keep the length of the wick 2 inches more than the candle. Pass the wick through the hole at the bottom of the mold and fix it with putty. Tie the wick at the other end of the mold with something like a stick or a pencil.Pour the wax into the mold. Let the wax cool for at least 12 hours. For better results, refrigerate it for another 12 hours. Remove the candle from the mold. Your home made candle is ready.Thrilled by it! Want some more of it? Then make a floating candle centerpiece!Hope you'll enjoy the creative candle making experience!!

Wednesday, June 10, 2009

Resep Kue Lidah Kucing


bahan :

  • 160 gr margarin
  • 60 gr gula tepung
  • 125 gr tepung terigu protein rendah
  • 25 gr tepung maizena
  • 4 butir telur
  • 1/4 sendok teh garam
  • 60 gr gula tepung

Cara Membuat :

  1. Kocok margarin 30 menit. Tambahkan gula tepung. Kocok rata.
  2. Masukkan tepung terigu dan tepung maizena sambil diayak dan diaduk rata. Sisihkan
  3. Kocok putih telur dan garam sampai setengah mengembang.Tambahkan gula tepung sedikit-sedikit sambil dikocok sampai mengembang.
  4. Tuang ke campuran tepung terigu sedikit-sedikit sambil diaduk perlahan. Masukkan dalam kantung plastik segitiga.
  5. Semprot di loyang lidah kucing yang dioles margarin.
  6. Oven 20 menit dengan suhu 140 derajat celsius.

Labels:

Resep Choco Chips Cookies


Bahan :

  • 180 gr margarin
  • 25 gr gula palem, blender halus
  • 100 gr gula tepung
  • 1 butir telur
  • 200 gr tepung terigu protein rendah
  • 30 gr tepung maizena
  • 20 gr susu bubuk
  • 1/2 sedok teh baking powder
  • 150 gr chocolate chips

Cara membuat :

  1. Kocok margarin, gula palem, dan gula tepung 40 detik. Tambahkan telur.Kocok rata
  2. Masukkan tepung terigu, tepung maizena, susu bubuk, dan baking powder sambil diayak dan diaduk rata .Tambahkan chocolate chips. Diaduk rata.
  3. SEndokkan di loyang yang dioles margarin
  4. Oven 25 menit dengan suhu 150 derajat celcius

Monday, June 8, 2009

Resep Roti Kopi


Bahan Roti :

  • 500 gr tepung terigu protein tinggi
  • 25 gr susu bubuk
  • 1 bungkus ragi instan
  • 50 gr gula pasir
  • 2 butir telur
  • 220 ml air
  • 75 gr mentega asin
  • 1 sendok teh garam 

Bahan Isi :

160 gr mentega asin, bagi menjadi 16 bagian (masing-masing 10 gr), simpan dalam freezer

Bahan Toping :

  • 75 gr mentega tawar
  • 100 gr gula tepung
  • 1 sendok makan kopi instan
  • 1 butir telur
  • 75 gr tepung terigu pritein rendah
  • 20 gr susu bubuk
  • 1/4 sendok teh esens coffeenoir

Cara Membuat :

  1. Roti, uleni tepung terigu, susu bubuk. ragi instan, gula pasir, telur, dan air sedikit-sedikit sampai kalis.
  2. Masukkan mentega asin dan garam. Uleni sampai elastis. Diamkan 30 menit.
  3. Topping, kocok mentega tawar, gula tepung, dan kopi instan 15 detik. Tambahkan telur. Kocok rata.
  4. Masukkan tepung terigu dan susu bubuk sambil diayak dan diaduk rata. Tambahkan esens coffeenoir. Aduk rata. Masukkan dalam kantung plastik segitiga. Sisihkan
  5. Kempiskan adonan. Timbang masing-masing 60 gr. Bulatkan. Diamkan 10 Menit. Kempiskan adonan. Isi dengan Mentega asin. Bulatkan. Diamkan 45 menit
  6. Semprotkan topping ke atas roti. Oven 13 menit dengan suhu 190 derajat celsius.

Resep KUE SUS


KUE SUS (bahasa Belanda: soes) adalah kue berbentuk bundar dengan rongga berisi fla (vla), custard, atau daging. Kue sus dengan isi vla atau custard disajikan setelah didinginkan di lemari es, karena vla atau custard yang berbahan baku susu mudah menjadi basi. Kue sus dalam bahasa Perancis disebut choux à la crème. Bentuk kue yang bundar seperti kubis menjadikan kue ini disebut choux (bahasa Perancis untuk kol).

Berbeda dengan adonan kue bolu dan cake, adonan kue sus bukan didapat dari mengocok telur atau mentega dengan gula. Adonan kue sus (pâte à choux) dibuat dari menambahkan tepung terigu ke dalam campuran air yang dimasak bersama margarin atau mentega hingga mendidih. Telur ayam ditambahkan satu per satu di dalam adonan sambil diaduk hingga adonan tidak lengket di panci. Adonan kue sus tidak menggunakan bahan pengembang seperti soda kue atau baking powder. Alat pengocok kue (mixer) hanya digunakan agar kue mengembang lebih bagus sewaktu dipanggang.

Oven yang digunakan untuk memanggang kue sus harus panas sekali (220 derajat Celsius). Panas oven mengubah kadar air yang tinggi di dalam adonan menjadi uap. Telur di dalam adonan membentuk kerangka kue yang tipis, sedangkan uap yang terperangkap di dalam adonan membuat rongga di bagian dalam kue. Adonan yang hampir serupa dengan kue sus digunakan untuk membuat kue-kue sejenis, misalnya: croquembouche, eclair, beignet, dan gougère.

Bahan Kue 

130 gr. Tepung terigu Cakra Kembar 
3 gr. Garam 
100 gr. Margarine 
4 butir Telur 
250 cc Air 

Fla Isi Sus : 
500 gr. susu segar 
75 gr. tepung maizena 
100 gr. gula pasir 
2 butir kuning telur ayam 
Vanili secukupnya 
Rum secukupnya 
Coklat pasta secukupnya 


Cara Memasak : 
Kue : 
- Air, garam, margarine dimasak sampai mendidih 
- Masukkan tepung terigu Cakra Kembar aduk sampai matang 
- Setelah adonan matang, kemudian didinginkan 
- Kemudian masukkan telur satu persatu sambil terus diaduk sampai rata 
- Adonan dibentuk 
- Adonan siap dibakar selama 25 menit. 

Isi Sus : 
- Semua bahan kecuali rum dicampurkan menjadi satu dan diaduk sampai rata 
- Masak sampai kental kemudian didinginkan 
- Masukkan rum dan aduk sampai rata. Isian sus siap digunakan 
- Bila isian sus ingin ditambahkan butter cream, tambahkan cream 2 kali dari jumlah adonan fla, aduk sampai rata.

Resep Kue Dorayaki


DORAYAKI

adalah kue yang berasal dari Jepang. Dorayaki termasuk ke dalam golongan kue tradisional Jepang (wagashi) yang bentuknya bundar sedikit tembam, terdiri dari dua lembar kue yang direkatkan dengan selai kacang merah. Dorayaki memiliki tekstur yang lembut dan mirip dengan kue Jepang yang disebut Kastela karena adonan yang mengandung madu.

Di Indonesia, makanan penganan ini mulai diperkenalkan di Indonesia bersamaan dengan anime Doraemon. Tokoh robot Doraemon mempunyai kegemaran makan kue dorayaki. Dorayaki yang dijual di toko kue di Indonesia rasanya sudah disesuaikan dengan selera lokal seperti dorayaki berisi campuran coklat dan keju. Dorayaki juga dikenal di Indonesia dengan sebutan Obanyaki.

Di Jepang, Obanyaki lebih dikenal dengan nama Imagawayaki .Walaupun Obanyaki mempunyai bentuk yang hampir sama dengan Dorayaki, kue Obanyaki lebih tebal dibandingkan dengan Dorayaki. Obanyaki juga biasanya dipanggang di depan pembeli sedangkan Dorayaki sudah dipanggang sebelumnya dan dijual dalam kemasan.

BAHAN:

4 butir telur

100 gram gula pasir

2 sendok makan madu

1/2 sendok teh garam

250 gram tepung terigu protein sedang

1 sendok teh baking powder

120 ml susu cair

Bahan Isi :

50 gram kacang merah, rebus

30 gram gula pasir

125 ml santan dari 1 butir kelapa

1 lembar daun pandan

1/8 sendok teh garam

1/2 sendok makan margarin

Cara membuat:

  1. Kocok telur, gula pasir, madu, dan garam sampai kental.Tambahkan tepung terigu dan baking powder bergantian dengan susu cair sambil diayak dan diaduk rata
  2. Panaskan wajan dadar. Tuangkan 1 sendok makan adonan. Biarkan mengembang. Balik adonan. Sisihkan.
  3. Isi :  masak kacang merah, gula pasir, santan, daun pandan, dan garam sambil diaduk sampai kalis. Tambahkan margarin. Aduk rata.
  4. Ambil dorayaki. Oles bahan isi. Tutup dengan dorayaki yang lain

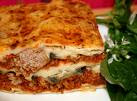
Resep Lasagna


Lasagna adalah pasta yang dipanggang di oven dan merupakan makanan tradisional Italia. Lasagna sendiri secara harfiah adalah lasagne yang berisikan daging. Lasagna sendiri dapat diisi dengan banyak isian lainnya seperti daging, sayur-sayuran, ayam, makanan laut dan sebagainya sesuai selera.

Kulit Lasagna dibuat dari adonan tepung terigu yang setelah diberikan isian, lalu dipanggang sampai matang.

Bahan

450 gram daging sapi cincang
1 kaleng (400 gram) tomat
100 gram jamur
1 buah bawang bombay, cincang
1 siung bawang putih
300 ml kaldu daging
25 gram mentega
1 paket (6 lembar) lasagne verdi

[sunting]
Bahan untuk saus putih
300 ml susu
25 gram mentega
25 gram tepung terigu
50 gr keju cheddar parut

[sunting]
Cara membuat
Untuk menyiapkan saus daging, tumis daging sapi cincang dan bawang bombay hingga berubah warna.
Campurkan dengan kaldu daging, bawang putih, tomat dan jamur (dicincang).
Masak selama 1 jam hingga kental.
Jika memungkinkan tambahkan 2 sdm tepung jagung dilarutkan dengan air dingin sampai kental.
Masukkan ke pinggan tahan panas.
Untuk membuat saus putih, cairkan mentega, campur dengan tepung terigu dan tambahkan susu, masak hingga mengental.
Tambahkan keju parut. Tambahkan pula bumbu sebagai rasa.
Lapisi bahan secara berulang, dimulai dengan saus daging, kemudian lasagna dan terakhir dengan saus putih.
Taburi dengan keju parmesan parut di atasnya dan panggang di oven pada suhu 200°C selama 45b menit.
Sajikan dengan keju parmesan.